
Sometimes there are many folders have accidentally been deleted by you, you may need it in another time. So, how to recover files from trash Mac OS X; if you want some important files from it.
Of course as technology enables deletion of any folders or files in your Mac, it enables also a lot of ways to restore the deleted files from trash Mac OS X. In this article we care about providing three methods of how to recover files from trash Mac OS X.
If your files are still kept in the trash can, that’s the first way to restore it again from it. If you have kept backups of files with Time Machine, you can recover them from there. If you delete it permanently, you can use recovery software applications; some of them maybe free so that you can restore the deleted files from your hard drive.
The first method: how to recover files from trash Mac OS X via looking in the trash can?
While you deleted some files, they sent firstly to the trash can. The trash holds them until you delete the files permanently. So, this the first step of how to recover files from trash Mac OS X via your trash can, you can open it from the Desktop.
After that look for the file or files you want to restore them from the trash can. If you did not find the files in the trash can, you can use one of the following methods to restore it.
Select the deleted item and right click on it, choose Put Back. If this option is not active, this means the original location is no longer present. So, you will need drag the file out of the trash and leave it on your Desktop. Then you can choose another location to save it again.
The second method: how to recover files from trash Mac OS X using the time machine?
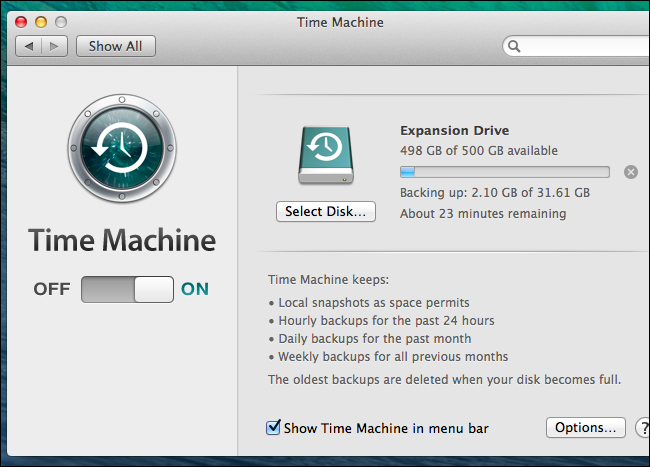
Step one of how to recover files from trash Mac OS X via checking the time machine; open the folder contains the files you want to restore. If you have used the time machine methods to create backups of your files, you can retrieve an older version of the deleted file. Open the original folder that contain your files you want to restore; for example if you deleted files from pictures folder, open the pictures folders.
Step two: connect your time machine drive. If the backups of your time machine are located on another external drive or external network, you must make sure that the drive is connection before procedure.
Step three: Open Time Machine menu which is located in the menu bar, choose “Enter Time Machine”. Wait a moment until your device connects to the Time Machine Drive.
Step four: You can find your backups by 3 ways; the first one by using the arrows and move between snapshots of that folder. The second one: you will find on the right side of the screen a timeline to select directly the backup you want, if you fined the entry on the timeline is dimmed, this means the backup disk which contains the snapshot is not connected. The final one; you can search directly in the search bar to find your files in the snapshot.
Step five: Preview the file by double clicking a file to open it, you will be able know more details about the file that is contained in the snapshot such as the version of the file which is the closest to the one you want.
Step six and the final one: the final step of how to recover files from trash Mac OS X via the Time Machine, restore your file by selecting the file you found and click on Restore. The file will be restored to its original location; you can select more than one file to restore them simultaneously. It the locations of each file is different you may be asked to restore all of them in a new folder.
The third method: how to recover files from trash Mac OS X using recovery software programs?
Of course there is a plenty of recovery software applications to restore deleted files in Mac OS X.
The first and most important step before using any data recovery program is to stop using your drive immediately. When you delete a file, it is set to be overwritten. So, you must stop using the drive to increase the opportunity to that the file has not been overwritten yet.
Note: do not open any programs or make any activities on any files “create, delete, save”. If your deleted file is on the start up drive, turn your Mac device off.
The second step: download the file recovery software application for example one of the following 4 programs:
Disk Drill
PhotoRec
File Salvage
Important note: as we said above, you must download the program on another computer so that you can find the file easily before make it be overwritten.
The third step: Try to install the data recovery program onto a USB drive. Or install it onto a portable drive connected to your Mac device. This will let you run the program off of the portable drive and keep your hard drive away from getting overwritten.
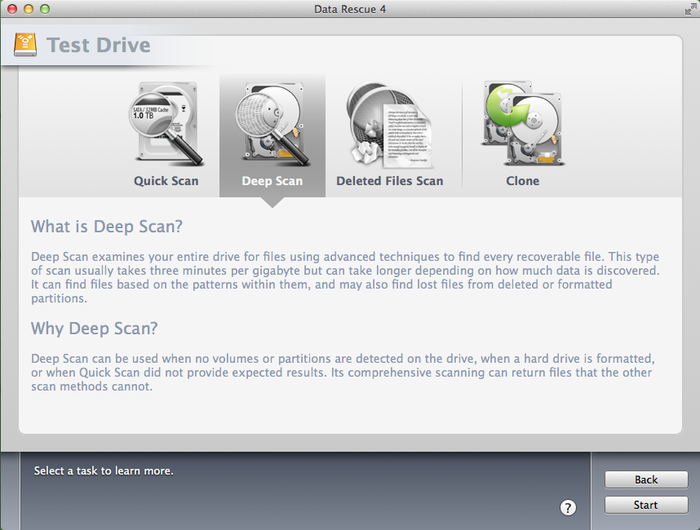
The fourth step: You will need to scan your drive and this depends on how to recover files from trash Mac OS X via the mentioned recovery programs.
Select the drive that contained the file you accidentally deleted. You can increase the speed of the scan by narrowing the search can. You can specify the types of files you want to look for.
- You have two options to scan your drive either using the quick or Full/Deep scan. You can use the quick scan if your file can be recovered, the full scan tool take a huge amount of time.
So if you can find your file using the quick scan, use the full scan instead.
- Some data recovery software applications come with an image that you can boot from. This enables you to recover more files than scanning from within OS X.
- If you are using PhotoRec, you will need to refer to the file system that the drive is using. You can select “Other” unless the disk has been formatted with the EXT2/EXT3.
Step five: after scanning select the file(s) you want to recover, you will find it is very difficult to find the file name, so you will need to preview each file individually so that you can find your file easily.
Step six: save your files in the location you want to save as. If you still have some files to recover do not save it in the same folder they were deleted from. So, save it in an external drive or another connected USB drive.
