
A lot of people need to route all Android traffic through secure tunnel to keep your Android’s mobile data connection safe against any snooping threats and you can get it done easily by many methods either manual methods which may require rooting for your Android device or easy and fast methods using free or paid software programs from Google play such as the VPN applications.
We will represent both of these methods to route all Android traffic through secure tunnel.
First method: how to route all Android traffic through secure tunnel manually
Before applying the method, you will need the following principles:
Root your Android phone “OS: 1.6 and above”
Download a free version of SSH Tunnel for Android from Google Play
An SSH Server to connect to
As we mentioned above to configure SSH Tunnel for Android, you will need to root your device to be able accessing settings of your Android phone. If your phone is still not rooted, you may apply the following steps to root your device so that you can route all Android traffic through secure tunnel.
Important warning before rooting:
Some manufacturers assert that rooting voids your device’s warranty. You will receive a warning message that rooting may damage your hardware; however rooting will not actually do this. You can back for this step and manufacturers won’t be able to tell if it’s been rooted.
You may damage the security of your device also not only your hardware. There may be some snooping threats attack your privacy and your private information.
- The steps of rooting your Android:
The actual process of rooting does not need more than one click. But before do this, you will apply some settings quickly first.
- Download Java JDK and Android SDK on your computer. Pay attention, you must install Java JDK first before installing Android SDK
- Enabling USB Debugging on your Android. Go to settings on your Android device, tap on Applications tab, and enable the USB Debugging check box.
- Connect your Android device to your computer via the USB cable of your phone. Of course you will need to setup the USB drivers, SuperOneClick will automatically install them. If they do not install, you can install them from the device online via the manufacture’s website.
- We choose SuperOneClick for rooting your device because it supports a wide plenty of different devices and works for most people. After installing it, open the application and click on Root Button. This process may take a few minutes.
- Restart your Android after rooting it.
SuperOneClick automatically installs the SuperUser binary; you can download it from Google Play also. So, whenever an app on your device tries to gain root permissions by calling the SU command, you’ll be prompted to allow or deny the request.
- You will need to setup SSH on Your Router for Secure Web Access from anywhere to route all Android traffic through secure tunnel. You may find a built-in SSH server on a router flashed with third-party Tomato firmware. But you will need to have an SSH server “whether hosted on a remote server or your home network” to connect into.
- Now, let’s say you have an SSH account with username and password and an authorized key pair for your account “to ensure more security”
- Download and configure SSH Tunnel for Android:
Of course there are other SSH tools for Android but we prefer this one for many reasons such as easy to configure it to route all Android traffic through secure tunnel. SSH tunnel was designed or released as a high encrypted tool for users in China and other countries to get rid of the oppressive and the hard restrictions on accessing the Internet.
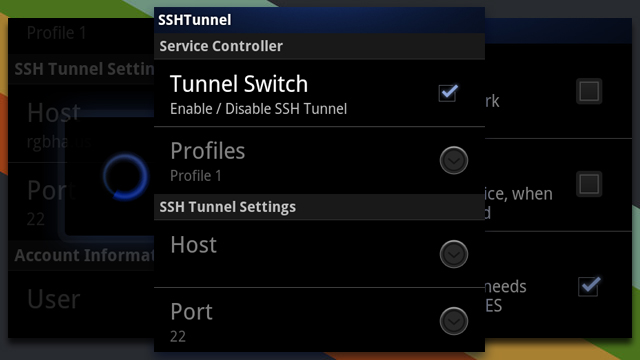
Install and run the application, you will find this screen at the first time configuring the application.
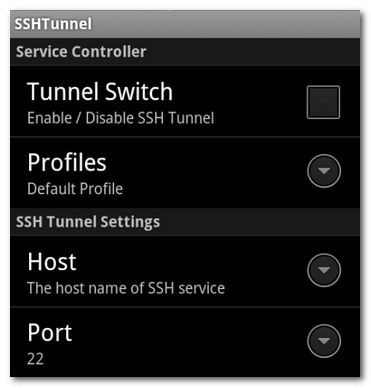
Do not turn the Tunnel on because we do not insert any login information yet. So, go to the SSH Tunnel settings section from the menu. Enter the following information:
Your host’s IP and the port the SSH server is listening on. The default port is 22, if you have changed it or been instructed by your SSH host to use an alternate one, leave it as 22.
Tap on the account information section; insert your username and password on the SSH server.
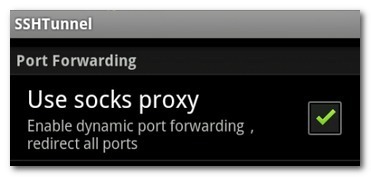
After you logged in either using username and password or using a private key; you will find the Port Forwarding section under the account information section. We suggest you turning on the built-in SOCKS proxy to make the application more compatible with the SSH Tunnel. So, tap on “Use socks proxy” and turn it on.
Now we achieved the step to route all Android traffic through secure tunnel; you have two choices either to route your entire Android data connection through your SSH server or selectively redirect applications through the server.
Check “Global Proxy” to route your entire connection, and check “Individual Proxy” if you want to selectively route specific applications you choose.
- Finally we are at the last step to route all Android traffic through secure tunnel. Before we run the tunnel, take a look at the last few configuration options; you can allow them or not according to what you want.
From the Feature Settings sub-section of the configuration menu:
- Auto Connect: turn it on if you want to set SSH Tunnel to automatically probe and connect to the SSH server whenever it is available.
- Auto Reconnect: Turn it on if there is an unexpected loss, to auto-reconnect protocol so SSH Tunnel will re-establish connection.
- Enable GFW List: This is a feature specifically for Chinese citizens; it enables the SSH Tunnel proxy service only for websites specifically blocked by China’s Great Firewall.
- Enable DNS Proxy: It is checked by default. It is good to leave it checked, so all your DNS requests are routed through the SSH server. If you uncheck it, your DNS requests will be sent through your phone’s data connection without the protection of the SSH tunnel. For example: if somebody are trying to spy you, he will see what you are visiting but not the data you are getting from these websites you are visiting.
Let’s test the connection now to ensure if you route all Android traffic through secure tunnel successfully.
Open your web browser on your phone, type what is my IP address in Google, you will find it as the same of your own even if you finished configured route all Android traffic through secure tunnel.
So, open SSH Tunnel and turn the Tunnel Switch on; then you will get a prompt from the root/SuperUser interface verifying that it’s OK to give SSH Tunnel super user permissions.
Now you are connected and route all Android traffic through secure tunnel. Go to your web browser and open Google again to see if your IP address changed or not. Of course you will find another IP address appeared according to the used SSH server.
Second method: how to route all Android traffic through secure tunnel using fast and easy VPN application from Google Play.
This feature is an exclusive one for this amazing unlimited VPN for Android. You can download this best unlimited OpenVPN over SSH client for Android to route all Android traffic through secure tunnel.
The main advantages of this ideal VPN software application that is very good for these countries that impose hard restrictions to access specific websites such as China.
- You do not need to root your Android phone to utilize SSH tunnel on it. Just one click on the program and all things will go ahead successfully.
- You will have a new IP address from a list of SSH servers to connect.
- No annoying ads like many VPN applications “hotspot Sheild”
- Cheap pricey
- Two simultaneous connections
- L2TP over IPSec protocol and OpenVPN protocol
- Use the same account to run the service on other Operating Systems “Windows, Android, Linux, iOS, and Mac Os X”
- Bitcoin payment accepted.
Finally it is all about your choice either route all Android traffic through secure tunnel manually and rooting your device or route all Android traffic through secure tunnel via this easy and fast and safe VPN tunneling over SSH protocol without needing to root your Android device.
